

Alex Kalotinis of Owen and Associates has recommended Shauna Lynn on LinkedIN: “Shauna has a flair for seeing the potential in any home. While sticking to a budget and maintaining a professional attitude, she transforms your home. I will be sure to use her for all future endeavors, whether selling or simply re-organizing my current home. Her expertise and attention to detail are unmatched!” August 5, 2010
Starting Plants from Seeds - BTSH Around The House Tip of the Week
A few weeks ago I talked about getting your yard ready for spring. While it is a great time to rake, clean up the debris of winter, and cultivate soil for our gardens, it may not be wise to put out new plants just yet. There is still some risk of frost, therefore it is best to wait for a couple of weeks. You can however get a head start by planting your seeds indoors, and allowing them to grow for a couple of weeks indoors before transplanting.
Tools You’ll Need
Seeds of your choice
Peat Moss Pots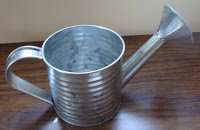
Sharpie
Plant Marker Posts
Large Container for Pots—I used an aluminum roasting pan
Small Watering Can
Soil
Plant Food (optional)
Getting Started
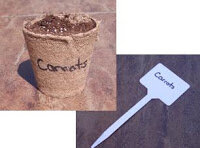 All plants will have somewhat varying instructions for planting. These should be printed on the back of the packages of seeds. Be sure to read through these carefully before you begin. This year I chose to plant beans, peas, carrots, cucumbers, and rosemary. I noted when reading through that peas are actually safe to plant directly outdoors, prior to last frost. All others were planted in pots according to their directions.
Next, decide how many pots of each seed you wish to do. Using your sharpie, label the peat moss pot to easily identify the plants later.
Fill your peat moss pots with soil. Plant seeds according to the package directions. Top with soil as needed. Place pots in the container you’ve chosen (as I mentioned, I simply picked up an aluminum roasting pan and arranged my pots in there). Lightly water the seeds, and place indoors in the sunniest location.
Caring for Your Seeds
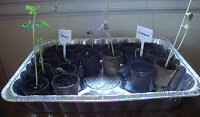 Water your seeds daily. After a few days, the seeds will start to germinate. Once you start to see some signs of plant-life, you can use some plant food if you like. Allow a couple of weeks for the plants to grow to a reasonable size before moving outdoors, ensuring that the chances of frost are minimal. The beauty of the peat moss pots is that these can be planted directly into the soil, no transferring required. Plant according to directions on the seed packages again, careful to lay out the plants based on available sunlight and their needs. For plants that grow into the ground, such as carrots, poke a few holes in the bottom of the pot to allow it to break through easily. Continue to water regularly. By summer, you’ll have a thriving, healthy garden!
Written by Shauna Lynn, Beyond The Stage Homes
www.beyondthestagehomes.com
Tools You’ll Need
Seeds of your choice
Peat Moss Pots
Sharpie
Plant Marker Posts
Large Container for Pots—I used an aluminum roasting pan
Small Watering Can
Soil
Plant Food (optional)
Getting Started
All plants will have somewhat varying instructions for planting. These should be printed on the back of the packages of seeds. Be sure to read through these carefully before you begin. This year I chose to plant beans, peas, carrots, cucumbers, and rosemary. I noted when reading through that peas are actually safe to plant directly outdoors, prior to last frost. All others were planted in pots according to their directions.Next, decide how many pots of each seed you wish to do. Using your sharpie, label the peat moss pot to easily identify the plants later.
Fill your peat moss pots with soil. Plant seeds according to the package directions. Top with soil as needed. Place pots in the container you’ve chosen (as I mentioned, I simply picked up an aluminum roasting pan and arranged my pots in there). Lightly water the seeds, and place indoors in the sunniest location.
Caring for Your Seeds
Water your seeds daily. After a few days, the seeds will start to germinate. Once you start to see some signs of plant-life, you can use some plant food if you like. Allow a couple of weeks for the plants to grow to a reasonable size before moving outdoors, ensuring that the chances of frost are minimal. The beauty of the peat moss pots is that these can be planted directly into the soil, no transferring required. Plant according to directions on the seed packages again, careful to lay out the plants based on available sunlight and their needs. For plants that grow into the ground, such as carrots, poke a few holes in the bottom of the pot to allow it to break through easily. Continue to water regularly. By summer, you’ll have a thriving, healthy garden!Written by Shauna Lynn, Beyond The Stage Homes
www.beyondthestagehomes.com
How To Make a Simple Spring Door Hanger - BTSH Around The House Tip of the Week
I often see some fun door hangers for spring, but always find that they’re just not quite the right size, or colour. This year, getting inspiration from my budding tulips and daffodils, I decided to try my hand at making my own. This was a lot of fun to make, incredibly inexpensive, and really quite easy. This is a project that could even be done with older kids (age 8 and up).
 Tools You’ll Need
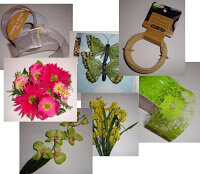
This is really up to you, depending on how you would like to decorate your wreathe, but I have listed what I used (all of which were simply purchased at the dollar store), and you can feel free to modify to your style:
Kraft Wire String
Ribbon (2 different complimentary colours)
Artificial flowers
Craft Butterfly
Glue Gun
 Making The Wreath
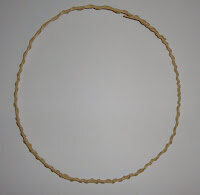
Now that you’ve selected your tools, start by making the wreath. To do this, I first made a circle to the size I wanted out of the kraft wire. Then I looped it again to double it, and then I wrapped the wire around the length of the circle, to give it stability. Then, I detached my flowers from their “stems”. The pink flowers were actually a part of a wreath already, but cut them off at their ends still. Next, I attached two of the larger flowers to what would become my outer two edges of the wreath. To attach, simply wrap a piece of kraft wire around the stem, and around the wire wreath (see picture at right). Next, wrap the whole wreath in one of the ribbons that you’ve chosen. I chose the green lace, and decided it would make the most sense to do this before attaching the remaining flowers. Use the glue gun to secure the lace to the wreath in it’s last loop around. Wrapping the lace in this way provided the wreath with even more stability, and gave it a great background colour to work with. Continue to attach flowers and/or butterflies or other accessories with kraft wire around the wreath until it is as full as you desire.
 The Finishing Touches
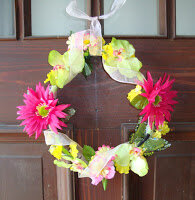
As a final touch, I loosely wrapped the sheer pink ribbon around the entire wreath, careful not to fully cover any of the flowers. I used the same lace to tie a loop at the top for hanging. This is now proudly displayed on my front door to welcome guests!
Written by Shauna Lynn, Beyond The Stage Homes
www.beyondthestagehomes.com
Tools You’ll NeedThis is really up to you, depending on how you would like to decorate your wreathe, but I have listed what I used (all of which were simply purchased at the dollar store), and you can feel free to modify to your style:
Kraft Wire String
Ribbon (2 different complimentary colours)
Artificial flowers
Craft Butterfly
Glue Gun
Making The WreathNow that you’ve selected your tools, start by making the wreath. To do this, I first made a circle to the size I wanted out of the kraft wire. Then I looped it again to double it, and then I wrapped the wire around the length of the circle, to give it stability. Then, I detached my flowers from their “stems”. The pink flowers were actually a part of a wreath already, but cut them off at their ends still. Next, I attached two of the larger flowers to what would become my outer two edges of the wreath. To attach, simply wrap a piece of kraft wire around the stem, and around the wire wreath (see picture at right).
Next, wrap the whole wreath in one of the ribbons that you’ve chosen. I chose the green lace, and decided it would make the most sense to do this before attaching the remaining flowers. Use the glue gun to secure the lace to the wreath in it’s last loop around. Wrapping the lace in this way provided the wreath with even more stability, and gave it a great background colour to work with. Continue to attach flowers and/or butterflies or other accessories with kraft wire around the wreath until it is as full as you desire.The Finishing TouchesAs a final touch, I loosely wrapped the sheer pink ribbon around the entire wreath, careful not to fully cover any of the flowers. I used the same lace to tie a loop at the top for hanging. This is now proudly displayed on my front door to welcome guests!
Written by Shauna Lynn, Beyond The Stage Homes
www.beyondthestagehomes.com
Creating The Outdoor Experience - BTSH Around The House Tip of the Week
Yesterday afternoon, while I should have been writing my Around The House Tip of the Week, I was instead drawn to the outdoors. It really is hard to resist enjoying the sunshine, and soaking up a little vitamin D. Though it is a typical spring day, with the sun mixed with a cool breeze, it’s not quite summer yet. In fact, it is just the beginning of spring, and while I was working on preparing my yard and gardens, I thought of how I could further improve my yard and make it an inviting “room” for entertaining. Manufacturers and retailers have really focused on outdoor entertaining, and provide solutions to all your entertaining needs. Regardless of your budget, you can create an outdoor retreat to enjoy for all as long as the season allows.
The Backyard Bartender
 Every time I visit a sunny southern destination, I consider picking up and moving, and becoming a beach bartender. While that may be a far-off dream, I can certainly enjoy creating some tropical cocktails in my own backyard. Having been a bartender for over a decade, the bartender in me has dreams of a custom built and well-designed outdoor bar. If you decide to go with custom built, be sure to hire the right professionals to take care of the plumbing and electrical. Consider combining your grill and your bar, for the full entertaining experience.
 While custom-designed is always a great idea, it may not be the most practical, especially if you spend very few months of the year entertaining outdoors, as you’ll need to ensure that any outdoor permanent fixtures are protected from the elements in the winter months. There are however many great portable outdoor bars available with great functionality, but also give you the option of moving into a shed or garage in inclement weather.
 Create The Mood
Want the warmth of a fire, without the hassle of collecting wood, starting the fire, and then maintaining it? Not to mention the smell of campfire that sticks to your hair and clothes for days (mmm...campfire). While not a new concept in outdoor entertaining, there is a greater selection than ever now of outdoor fire bowls, such as the Venetian Fire Bowl from Canadian Tire (pictured at right). There are lots to choose from these days, ranging from tabletop size, to full size. You can even get a gas fire pit (pictured left). These are operated on propane, and are portable enough to be place almost anywhere in your yard. They help to provide heat on a cool night, as well as create a warm ambience.
 The Outdoor Living...Room
Decorating your outdoor room can be done with the same concepts in mind as decorating indoors. Look for inviting furniture with colours that compliment the surroundings, and create an enjoyable atmosphere for the activities that you enjoy outdoors. Look for durability and functionality, as well as comfort, for a room that you can enjoy all season long.
Written by Shauna Lynn, Beyond The Stage Homes
www.beyondthestagehomes.com
The Backyard Bartender
Every time I visit a sunny southern destination, I consider picking up and moving, and becoming a beach bartender. While that may be a far-off dream, I can certainly enjoy creating some tropical cocktails in my own backyard. Having been a bartender for over a decade, the bartender in me has dreams of a custom built and well-designed outdoor bar. If you decide to go with custom built, be sure to hire the right professionals to take care of the plumbing and electrical. Consider combining your grill and your bar, for the full entertaining experience. While custom-designed is always a great idea, it may not be the most practical, especially if you spend very few months of the year entertaining outdoors, as you’ll need to ensure that any outdoor permanent fixtures are protected from the elements in the winter months. There are however many great portable outdoor bars available with great functionality, but also give you the option of moving into a shed or garage in inclement weather.Create The MoodWant the warmth of a fire, without the hassle of collecting wood, starting the fire, and then maintaining it? Not to mention the smell of campfire that sticks to your hair and clothes for days (mmm...campfire). While not a new concept in outdoor entertaining, there is a greater selection than ever now of outdoor fire bowls, such as the Venetian Fire Bowl from Canadian Tire (pictured at right). There are lots to choose from these days, ranging from tabletop size, to full size.
You can even get a gas fire pit (pictured left). These are operated on propane, and are portable enough to be place almost anywhere in your yard. They help to provide heat on a cool night, as well as create a warm ambience.The Outdoor Living...RoomDecorating your outdoor room can be done with the same concepts in mind as decorating indoors. Look for inviting furniture with colours that compliment the surroundings, and create an enjoyable atmosphere for the activities that you enjoy outdoors. Look for durability and functionality, as well as comfort, for a room that you can enjoy all season long.
Written by Shauna Lynn, Beyond The Stage Homes
www.beyondthestagehomes.com
Choosing The Right Flooring For Your Home - BTSH Around The House Tip of the Week
While it would be difficult to tell you all you need to know on the various choices of flooring in one article, I wanted to hit some key points for various flooring options available today to allow you to make an educated choice. I’m a “carpet-free” believer, so have focused on bringing you information on hardwood floors, as well as some great hardwood alternatives.
 Cork Flooring is made from the bark of the cork oak series. The bark naturally re-grows and can be harvested again in 9-12 years without any harm to the trees. It provides great sound and heat insulation, and is naturally resistant to mould, mildew and bacteria. It is incredibly durable, and very compressible and elastic, meaning that if dented, it will often regain shape once the pressure is released. Cork is considered one of the comfortable most flooring options available. It has a unique cellular structure, with millions of cells enclosed with a gaseous substance. It gives a soft feeling to the feet and joints of people walking and standing on cork floors for long.
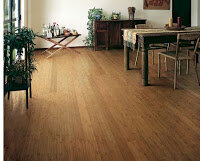 Bamboo Flooring has attracted a lot of attention over the last several years as bamboo is a rapidly renewed resource that is generally grown without the use of pesticides or other harmful chemicals. These floors can be very durable and long-lasting, and come in a variety of styles, similar to hardwood. There are some cautions when it comes to bamboo though. Be sure to look for a mature bamboo, such as Moso which is harvested after 5 years. As well, to prevent warping look for a kiln-dried bamboo to ensure a low moisture content.
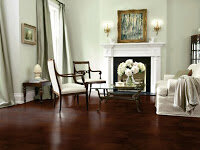 Leather Flooring, while once reserved for the rich and famous, is now quite economical, in addition to being eco-friendly. Eco-engineering has made it possible to create beautiful, durable leather flooring that is environmentally friendly and sustainable with an innovative use of recycled leather. Torly’s Leather has been a leader in this field, and backs their leather floors with a 25 year warranty. Torly’s leather floors contain no harmful VOC emissions, no added formaldehyde and exceed California Indoor Air Quality standards, giving you a healthier home.
 Hardwood Flooring today is available in a great variety of styles, widths, and colours. Always a classic choice, today’s hardwood floors are easier to install and easier to care for than ever. Hardwood floors can still fade due to direct sunlight, and can scratch fairly easily. They generally need to be refinished every several years, but can last for the life of the home.
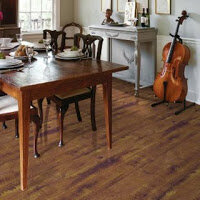 Laminate Flooring is a much less expensive alternative to any of the other floors mentioned in this article. It is scratch, fade, impact, and stain resistant, and is very easy to care for. These floors give the look of hardwood, for a fraction of the cost, and can be installed almost anywhere in the home. While they never need to be refinished, their life expectancy is generally less than 20 years. Be sure to keep this in mind when choosing to install in your home.
Written by Shauna Lynn, Beyond The Stage Homes
www.beyondthestagehomes.com
Cork Flooring is made from the bark of the cork oak series. The bark naturally re-grows and can be harvested again in 9-12 years without any harm to the trees. It provides great sound and heat insulation, and is naturally resistant to mould, mildew and bacteria. It is incredibly durable, and very compressible and elastic, meaning that if dented, it will often regain shape once the pressure is released. Cork is considered one of the comfortable most flooring options available. It has a unique cellular structure, with millions of cells enclosed with a gaseous substance. It gives a soft feeling to the feet and joints of people walking and standing on cork floors for long.Bamboo Flooring has attracted a lot of attention over the last several years as bamboo is a rapidly renewed resource that is generally grown without the use of pesticides or other harmful chemicals. These floors can be very durable and long-lasting, and come in a variety of styles, similar to hardwood. There are some cautions when it comes to bamboo though. Be sure to look for a mature bamboo, such as Moso which is harvested after 5 years. As well, to prevent warping look for a kiln-dried bamboo to ensure a low moisture content.Leather Flooring, while once reserved for the rich and famous, is now quite economical, in addition to being eco-friendly. Eco-engineering has made it possible to create beautiful, durable leather flooring that is environmentally friendly and sustainable with an innovative use of recycled leather. Torly’s Leather has been a leader in this field, and backs their leather floors with a 25 year warranty. Torly’s leather floors contain no harmful VOC emissions, no added formaldehyde and exceed California Indoor Air Quality standards, giving you a healthier home.Hardwood Flooring today is available in a great variety of styles, widths, and colours. Always a classic choice, today’s hardwood floors are easier to install and easier to care for than ever. Hardwood floors can still fade due to direct sunlight, and can scratch fairly easily. They generally need to be refinished every several years, but can last for the life of the home.Laminate Flooring is a much less expensive alternative to any of the other floors mentioned in this article. It is scratch, fade, impact, and stain resistant, and is very easy to care for. These floors give the look of hardwood, for a fraction of the cost, and can be installed almost anywhere in the home. While they never need to be refinished, their life expectancy is generally less than 20 years. Be sure to keep this in mind when choosing to install in your home.Written by Shauna Lynn, Beyond The Stage Homes
www.beyondthestagehomes.com
Storage Solutions - BTSH Around The House Tip of the Week
I continually hear people say “I wish I could be as organized as you!”. I am always looking for ways to better organize my own home, and make things easier to find and access. I’m a firm believer in having everyday things at my fingertips. The first step in organizing is to sort through the areas of clutter and arrange a system. Categorize the items by what needs to stay where it is (but in an organized way of course), what is truly junk and can be tossed, and what is worth keeping, but is in the wrong place. Once you’ve done this, start with the “wrong place” items, and put them in the correct place immediately. Next, conquer the clutter and organize the items that are going to stay put.
Small Solutions
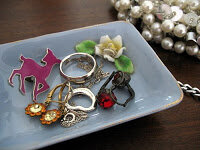 Jewellery trays—these don’t have to be your traditional silver trays, but can be a vintage ceramic plate or bowl. I keep one in every bedroom in my house, so that guests have a safe place to put their jewellery, watches, and other tokens.
Store remote controls in a decorative dish or basket (one with dividers is ever better!). This could also be a good place to keep a pen and paper handy.
Use small clear containers or reseal-able bags to store small items such as paper clips, hair elastics, travel shampoos, etc. By using a clear container, it will be easy to find, and keeps all like items together. I have a large collection of craft items and find that this is the best way to keep all my thingamajigs and doohickies organized.
Kitchen Storage
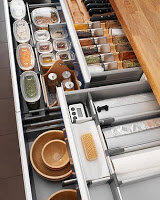 Perhaps the room that simply never seems to be big enough, or have enough storage space! When doing staging projects, one of the first things that I always suggest to homeowners is to clear off the kitchen counters. From a resale point of view, buyers want to see the counter space available, so you don’t want to hide it. The problem? Homeowners shriek at the thought of having to find room in their cupboards for the items that are sitting on the counter! As a first step, I always recommend looking at what is on the counter, and see what is used several times a week. For items that are not used as often, consider how important it is to the kitchen, and whether it can be stored in another storage area (such as a crawl space, closet, or even the garage), or whether it can be tossed altogether.
A Few More Kitchen Tips
Add drawer dividers to keep even your junk drawer organized
Use clear, stackable containers to store flour, sugar, rice, etc in your cupboards
Make use of the empty space above the fridge—place baskets or storage boxes to keep it looking clean and organized, and store takeout menus, recipes, and special occasion dishware.
I Know I Said To “Toss” It, But Please Don’t Throw It Out
Since this article touches so much on “tossing” unnecessary items, which may not be the most environmentally friendly approach, consider donating to a salvage store, or selling through a local classified paper or online site. The latest in re-using is “Freecycle”, which allows only free items to be posted in an effort to keep them out of landfills. Search online to find a site for your region.
Written by Shauna Lynn, Beyond The Stage Homes
www.beyondthestagehomes.com
Small Solutions
Jewellery trays—these don’t have to be your traditional silver trays, but can be a vintage ceramic plate or bowl. I keep one in every bedroom in my house, so that guests have a safe place to put their jewellery, watches, and other tokens.Store remote controls in a decorative dish or basket (one with dividers is ever better!). This could also be a good place to keep a pen and paper handy.
Use small clear containers or reseal-able bags to store small items such as paper clips, hair elastics, travel shampoos, etc. By using a clear container, it will be easy to find, and keeps all like items together. I have a large collection of craft items and find that this is the best way to keep all my thingamajigs and doohickies organized.
Kitchen Storage
Perhaps the room that simply never seems to be big enough, or have enough storage space! When doing staging projects, one of the first things that I always suggest to homeowners is to clear off the kitchen counters. From a resale point of view, buyers want to see the counter space available, so you don’t want to hide it. The problem? Homeowners shriek at the thought of having to find room in their cupboards for the items that are sitting on the counter! As a first step, I always recommend looking at what is on the counter, and see what is used several times a week. For items that are not used as often, consider how important it is to the kitchen, and whether it can be stored in another storage area (such as a crawl space, closet, or even the garage), or whether it can be tossed altogether.A Few More Kitchen Tips
Add drawer dividers to keep even your junk drawer organized
Use clear, stackable containers to store flour, sugar, rice, etc in your cupboards
Make use of the empty space above the fridge—place baskets or storage boxes to keep it looking clean and organized, and store takeout menus, recipes, and special occasion dishware.
I Know I Said To “Toss” It, But Please Don’t Throw It Out
Since this article touches so much on “tossing” unnecessary items, which may not be the most environmentally friendly approach, consider donating to a salvage store, or selling through a local classified paper or online site. The latest in re-using is “Freecycle”, which allows only free items to be posted in an effort to keep them out of landfills. Search online to find a site for your region.
Written by Shauna Lynn, Beyond The Stage Homes
www.beyondthestagehomes.com