Feng Shui - BTSH Around The House Tip of the Week

The Ancient Art—Using it in Modern Times

Feng Shui (pronounced fung’-shway’)

Literally translated, means “wind-water”. In order to fully understand this ancient art, you would need to study for years, all aspects including it’s history and origin, to the various schools of thought and methods, to how to translate it for today’s modern living. I don’t pretend to be an expert, but as a designer, I have picked up several tips along the way, and truly believe that the basic principles of feng shui make great decorating sense.

The Basic Ideas

Feng Shui is essentially a method used to create harmony. It is a balancing of the energies, or Chi, to bless the home and bring good health and good fortune to those who live there. Chi flow then is the flow of these vital energies. The main goal in feng shui is to channel, or direct the Chi inside your home so that it nourishes all areas, and supports a good flow of Chi inside your body. Understandably then you would want to avoid anything blocking the Chi from reaching everywhere in your home. This sounds complex, but is really quite simple. Instead of imagining the energy flow, imagine a flow of water through your home. Where would it get stuck? Would it get blocked at the door, or perhaps the room is too cluttered for it to move about? To help to avoid Chi blockage, Feng Shui emphasizes the importance of decluttering. As well, you want to ensure that the entry to a room is not blocked by a wall or large piece of furniture. This of course makes good decorating sense as well. You want to be sure that a room feels open when you walk into it, and allows for a proper flow of traffic.

Now, while you want the Chi to flow freely, you don’t want it to flow out of your home, or flow through the home frantically, such as through hallways. Place obstacles that will slow down the flow of the Chi, while not inhibiting it’s movement. For example, if your front door and back door are aligned, place a round table in between to allow the Chi to easily move around it, but slow it down from heading directly out the door. Another idea is to add plants in areas that will redirect the Chi, as the Earth is an important element in Feng Shui.

Applying Feng Shui

Here are some basic techniques that you can apply when designing your home:


1. Keep the design free flowing, but avoid long hallways
2. Choose warm lighting
3. Place healthy plants with full leaves throughout the home
4. Avoid blocking entryways with furniture
5. Declutter and avoid over decorating with too many knick-knacks

Practice these ideas to all the Chi to flow freely for a warm, harmonious home.

Written by Shauna Lynn, Beyond The Stage Homes
www.beyondthestagehomes.com

The GREEN Movement - BTSH Around The House Tip of the Week

Choosing paint that’s right for you, and for the environment

2009 Colour Trends

If there is one colour we simply can’t get enough of in 2009, it’s gotta be GREEN!! That’s right, not just an eco-friendly idea, but top paint companies like ICI Dulux, and Benjamin Moore, agree that green is the new beige. Green is a very serene and calming colour, and reminds us of natural elements and what our environment has to offer us.

One thing I cannot stress enough in decorating is that neutral does not have to mean builders beige. I am often caught reciting this to my clients. Don’t get me wrong, there are some wonderful neutrals in the taupe/beige family, but neutral does not have mean dull, lack-lustre, and boring. Feel free to add a touch of colour to your neutral.

In Home Staging especially, you will hear various ideas about the best way to show your home in order to maximize your profits. Decluttering and depersonalising are two that are undoubtedly and consistently true in every home. Depersonalising refers to taking down the family photos and knick-knack souvenirs from family vacations in an effort to allow potential buyers to envision themselves in your home. You’re essentially selling a product. Often this also can mean covering up the brightly painted walls as well. While you may want to live in a rainbow of colours, as I mentioned you are selling a product, and therefore it’s often a good idea to tone down the colours in your home to something more neutral. That being said, it’s unlikely that potential buyers will want to live in builder’s beige. Feel free to explore colours outside the beige family, provided it is a nice soft hue, such as a lemon yellow, or a light olive green.


What makes a paint an environmentally friendly “green” paint?


Paint has been given a bad rap for years, due to the fumes and chemicals that are put into the air from it, otherwise referred to as VOCs (Volatile Organic Chemicals). So how do you know if you’re choosing a green product? While many paint manufacturers claim to be green, very few actually are. Part of the inaccuracy of their claims stems from the vast number of certification organizations with a variety of standards. According to TerraChoice, an environmental marketing company that manages the EcoLogo program, organizations that can be trusted include EcoLogo, the Forest Stewardship Council (FSC), Green-e and Greenguard. If you’re unsure about a paint, look for the certification from one of these companies. Look for natural paints, or at the very least, zero to low VOC paints. The standards are continually evolving, and new methods are continually introduced for creating an environmentally friendly paint that will adhere easily, and is durable enough to stand the test of time. If you’re still unsure, ask your local paint professionals.

Written by Shauna Lynn, Beyond The Stage Homes
www.beyondthestagehomes.com

Create Your Own Unique Centrepiece - BTSH Around The House Tip of the Week

Fun with paper mache!

I had a great idea for a centerpiece for my dining table that would serve a double purpose. I believe that every home should have at least one large serving bowl, but of course storing these can be a real chore. I thought if I could find one that would look great on the table as a centrepiece, I could fill it with something eye-catching to complete the look. I noticed that a lot of home stores had these funky, light-weight, textured balls, but not only were they expensive, I couldn’t seem to find any in the colours that I was looking for. So, when all else fails, DIY! Making these balls was a fun project, and gave me a lot of flexibility in terms of colour and sizes.

TOOLS YOU’LL NEED:

Styrofoam Balls (quantity and sizes are up to you)
Newspaper
Flour
Water
Mixing Bowl
Needles (same quantity as balls)
Thread
Coat Hanger
Spray Paint

Cut the newspaper into strips. Next, prepare the paper mache mixture in your mixing bowl, by combining 3 parts water with 1 part flour. Dip the newspaper in the mixture, and spread over the Styrofoam ball. Continue this until the ball is completely covered, and leave to dry (if you have a baking cooling rack, placing the balls on this will work well to ensure the ball dries evenly). Continue this for each ball. Be sure that all balls are completely dry before painting. I recommend leaving for a full 24 hours.

When it comes to painting the balls, you want to be sure that you get full, even paint coverage on each one. This is why we hang them from the coat hanger. Thread needles and tie at the base of the needle. Then hang on a few inches of thread, and tie to the coat hanger. Stick the needle through a Styrofoam ball. You want to be sure the balls are not touching each other, but you should be able to fit 3-4 on each coat hanger, depending on the size of the balls. Finally, spray each ball with the colour of your choice. Have some fun with this and use multiple colours! Be sure all balls on one coat hanger are the same colour though so you don’t need to worry about possible spatter. Hang the coat hanger on a hook or rod and leave to dry. Once the balls are dry, simply remove the needle, and arrange the balls in your bowl. The hole left by the needle will be so small you won’t notice it, but if you do, simply spray the area with a little more paint. These make a great accent piece for any dining table, and a great conversation piece as well when your guests ask you where you got them!

Written by Shauna Lynn, Beyond The Stage Homes
www.beyondthestagehomes.com

Cork Board Make-Over - BTSH Around The House Tip of the Week

Covering with fabric allows you to colour coordinate your cork board with your space. Recover to repurpose!

Cork boards are a necessity in any office space. They allow you to keep memos, messages, and other important information at your fingertips, and top of mind. Unfortunately, most are not designed to be aesthetically pleasing. The best solution for this is a simple project to cover your bulletin board with a fabric of your choice that will suit your work space.


TOOLS YOU’LL NEED:

Cork board (purchase one the right size and shape for your space)
Fabric
Cotton Batting
Glue Gun
Staple Gun
Thumb Tacks or Upholstery Tacks
Beads
Ruler


Measure your cork board, adding 4 inches to your width and length, then cut your fabric accordingly. The cotton batting should be cut to the size of the cork board, adding only about a 1/2 inch to ensure full coverage. Place your fabric on your work surface with the wrong side up (I prefer to simply use the floor for this). Place the cotton batting centered on the fabric. Place your cork board upside down, centered on the batting. Pull one side of the fabric over the back of the cork board, and staple in the center, then do the same to the opposite side. Continue around the board, being sure to tuck in the corners neatly.

Trim any excess fabric, and use the glue gun to glue down the fabric edges for a clean finish. You can then leave the board as is, or you can add criss-crossing ribbons, or tacks (as I have done). For the tacks, I simply used thumb tacks, but you can also use the staple gun to place staples, or use upholstery tacks. Be sure to use a ruler to ensure proper spacing and alignment. Then simply glue your bead or silk flower to the tacks for an added decorative touch. This project was completed start to finish in about 15 minutes!

Written by Shauna Lynn, Beyond The Stage Homes
www.beyondthestagehomes.com

The Wonders of Paint - BTSH Around The House Tip of the Week


It’s easy to freshen up the look of any room with fresh paint, but why limit yourself to the walls?


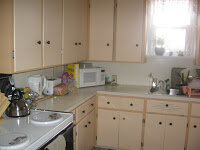
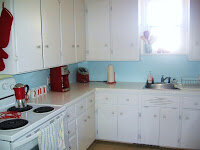
EXTREME KITCHEN MAKEOVER ON A BUDGET

It’s hard to believe that this is the same kitchen in both pictures. It’s amazing to see how a little paint helped to freshen up the look of this dated kitchen. If you’re planning to paint your kitchen cabinets, be sure to choose a primer and paint that are suited for the surface you’re painting. If you’re unsure, ask at your local paint store. No matter what the surface, remove all doors and sand before painting. Because these cupboards had been painted previously, they were completely stripped down (turned out there were a couple more layers of paint under that peach colour)! Update the hardware as well, including the hinges. You’ll also note that the backsplash in this kitchen was painted. Both the backsplash and counter were an old arborite laminate, and unfortunately it wasn’t in the budget to replace these. Instead they were sanded, painted with a melamine paint, and sealed with a lacquer.

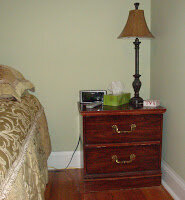
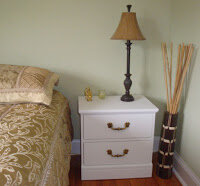
WHAT WAS OLD IS NEW AGAIN


This bedside table was showing it’s age, but it still had good bones. It was about 30 years old, solid wood, and the perfect size for this space. So, it was sanded down, primed, and painted white. Because of the thick varnish on the wood, I used a bonding primer. It bonds to any surface, and allows the paint to bond to it easily as well. While I would normally suggest updating the hardware, in this case, the brass drawer handles went great with the gold in the bedspread, and so they were simply polished and re-attached.

SPRUCE IT UP WITH FUN STENCILS

Stencilling is an age old technique, and is a great way to add a personal touch, or simply add a touch of colour to any wall or furniture piece. Stencils can be found at any craft store, or online. Want to spice it up with multiple colours? If using a single template, simply tape over the areas that you want to paint a different colour. Multilayer stencils with overlays make multi-colour stencilling a lot easier. Simply tape the base stencil to the surface, paint the first colour and remove, then place the overlay according to the registration marks on top of the base, and paint with the next colour.


*All stencil images found at stencilease.com

Written by Shauna Lynn, Beyond the Stage Homes
www.beyondthestagehomes.com

Cool Finds & Industry Trends - BTSH Around The House Tip of the Week

Cool Finds & Industry Trends

This week I wanted to share some clever items that are great for every home, as
well as some trends that I’ve been following this season.

DESIGN YOUR OWN FABRIC


Want to make-over your cushions or curtains, but just can’t find the right fabric? Spoonflower.com can help with their unique custom fabrics. Simply upload a picture, clip art, or your child’s latest colouring project! There is no minimum order, and you can order sample swatches, or order your fabric by the yard (price range $18-$32).

TRY TO BREAK THIS VASE!

These bendable vases are great for homes with kids, and pets. Use as a pencil holder or key dish, or turn the lid up for a bright, attractive vase! Comes in a variety of vibrant colours. Featured in the March 2009 issue of Canadian House & Home. Menu rubber vessels available at Bergo, Toronto (416) 861-1821.

CHOOSING THROW CUSHIONS FOR YOUR SOFA

Symmetry is out! You no longer have to match your cushions to your drapes, and place 1 or 2 pillows symmetrically at each end of your sofa, being sure that they match. All the rules your mother taught you, throw them away! More and more we’re seeing a variety of fabrics and trims on cushions, on the same sofa, working together.
A FEW TIPS: Balance cushions with trims with a few straight edged cushions, and be sure that the colours chosen are complimentary, but feel free to mix flowers with stripes, and checkers with paisleys. Use a variety of sizes and shapes to really spice things up.

WALLPAPER IS BACK BABY!

That’s right, wallpaper is back, but before you get scared, hear me out. Today’s
wallpapers have great designs, and are easy to hang. A great way to make a
statement in any room, choose from a variety of luxurious wallpapers in a range
of colours and styles. Add texture to your wall without the hassle of faux finish
painting by choosing a paintable wallpaper. Trust me, you’ll be glad you did!
Where do you find it? Pretty much anywhere they sell paint, you’ll find wallpaper.

Written by Shauna Lynn, Beyond The Stage Homes
www.beyondthestagehomes.com